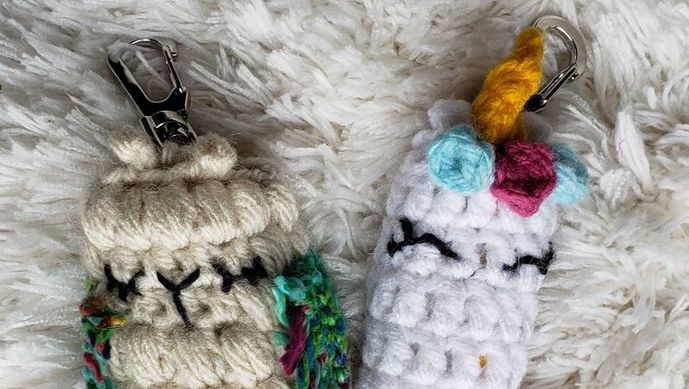
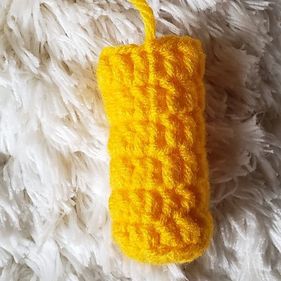
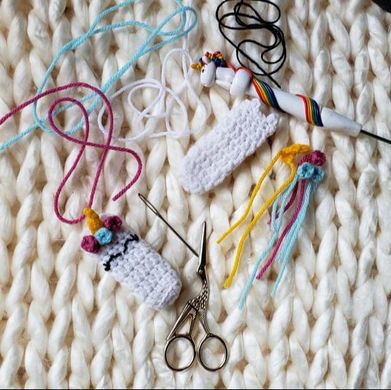
 Hey crafty people!! This week I'm changing it up just a little. I read every comment and message from all of you. Your feedback is always heard and very much appreciated. I have received messages from people telling me that they love my lighter cover designs but they don't use lighters so i wanted to come up with an alternative without having to change the patterns. So i was trying to think of different things these patterns can be used for besides lighters and key chains and charms are something that i think a good majority of crafty people use. I decided to give it a try with a couple of my covers and I think they are even cuter as key chains than they are as lighter covers hehehe. It's really easy to do too. So let's get started!
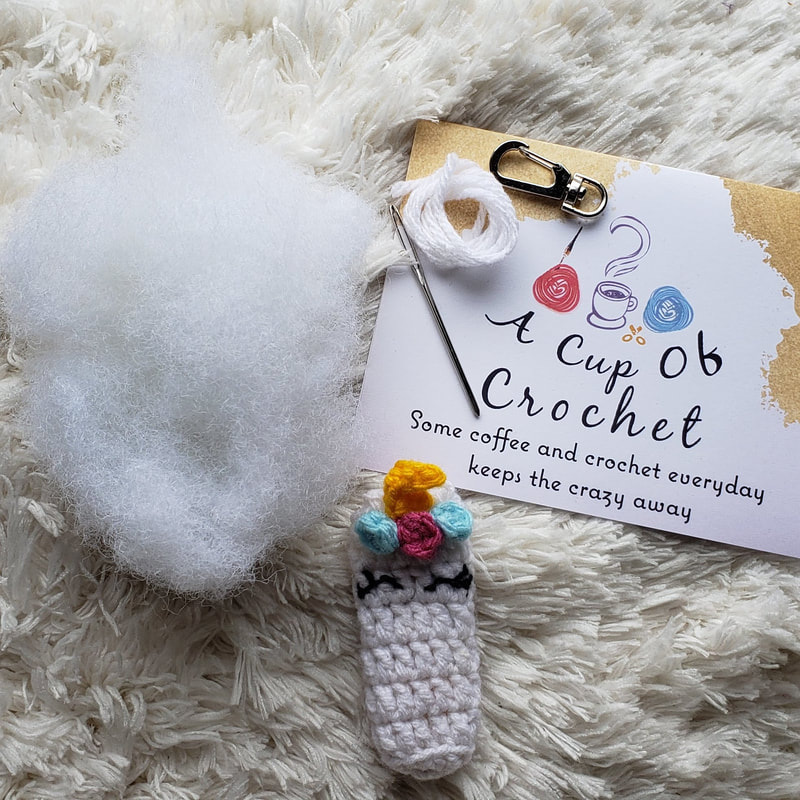
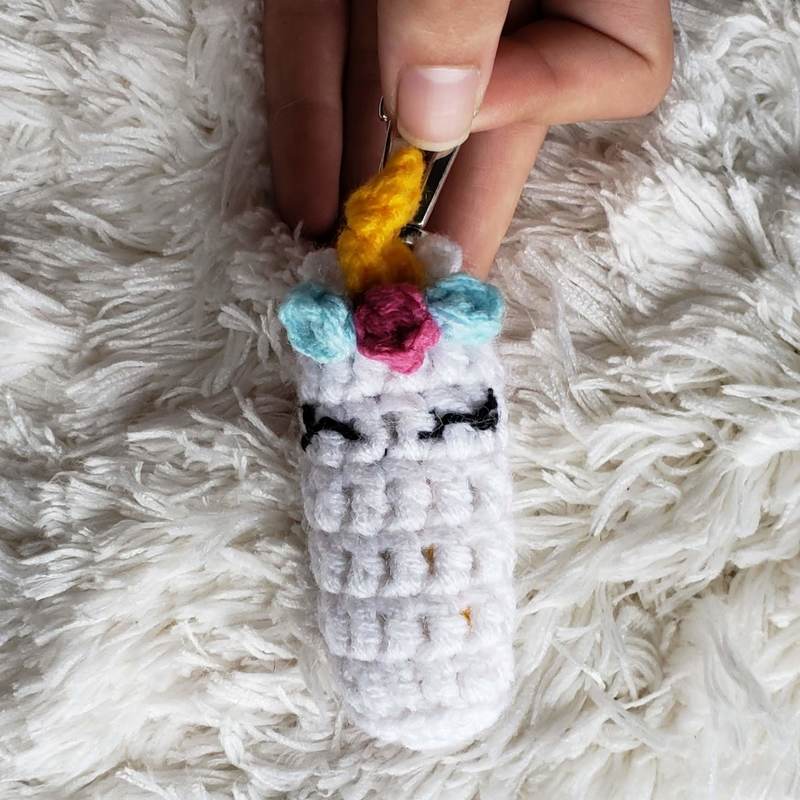
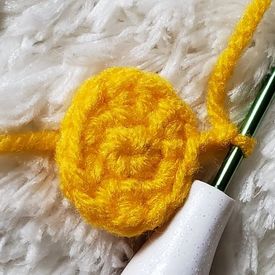
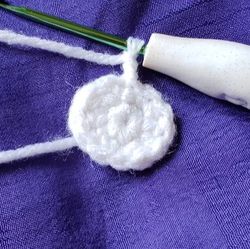
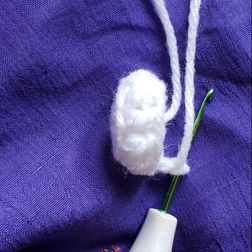
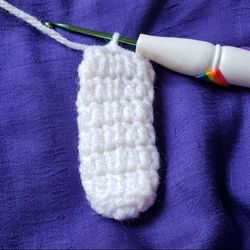
The slip stitch used to join and finish off your lighter covers is considered a stitch in this pattern. If you are an experienced crocheter then you can follow the written instructions below to complete your key chain / charm. If you are a beginner and need more help there are photos under each step of the written instructions to help you. Start by stuffing your lighter cover slightly. You don't want to stuff to much or else you could distort the stitches causing stuffing to show through. (photos 1 and 2)
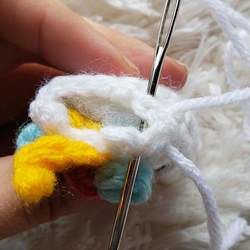
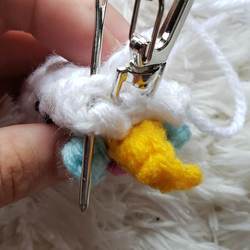
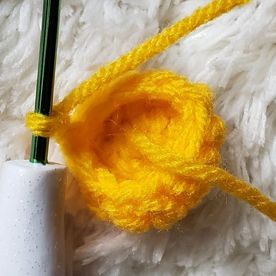
Now, thread your needle with some yarn that matches the color of your lighter cover. Insert your needle into the two stitches that are on the side of your lighter cover and pull through leaving a tail to tie off with at the end. (photo 3) Insert your needle into the next stitch and the stitch across from it and pull through. (photo 4)
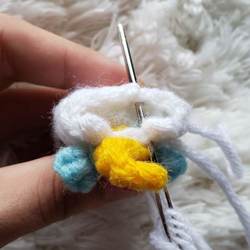
Insert your needle into the next stitch and the stitch across from it and pull through. (photo 5) Insert you needle though the next stitch and pull through. Do not go through the stitch across from it. (photo 6)
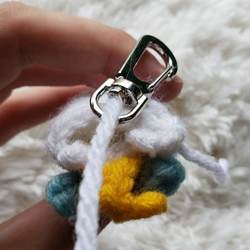
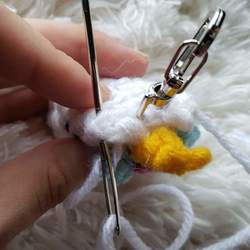
Remove you needle and place the key chain clip on your yarn and then re-thread your needle. (photo 7) Wrap your yarn around the key chain clip a few times before inserting your needle into the stitch across from the stitch you went through previously. (photo 8)
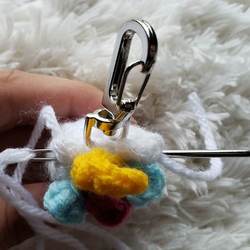
Insert your needle into the next stitch and the stitch across from it and pull through. (photo 9) Insert your needle into the next stitch and the stitch across from it and pull through. (photo 10)
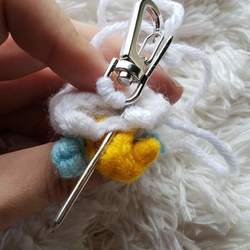
Insert your needle into the last two stitches that are on the other side of your lighter cover and pull through. (photo 11) Insert your needle back through the last stitch through to the first stitch where your tail is and tie your two ends together (photo 12)
Cut your ends if necessary and sew them inside the lighter cover to hide them. All Done!!! I hope you enjoyed this pattern. Please feel free to contact me with any questions or if you notice any errors. We are all human and don't always catch our own errors so I appreciate any opportunity to be a better designer and pattern writer. Thank you!! Tag me of social media!! I would love to see your Lighter Covers turned Key Chains / Charms.
30 Comments
Hey crafty people!!
This week I want to chat with you a bit about making tutorials. Let me start by saying that I am not a professional tutorial maker by any means. I have only recorded a few, but I do think I have learned a few tips and tricks lately that could help others. I wish I had these tips before I even tried recording a tutorial for the first time. If you are like me, then you do your crafting on a budget. No shame in that, but this can make it seem like it is impossible to get quality videos. Well I'm here to tell you that is not the case. Through a lot of trial and error on my part, I found a few things that may help you. I do not have a computer capable of editing videos. Since I'm on a budget this leaves me with my phone as an editing tool. First, there is an app called VideoShop. If you have a device that does not record in HD then this app is great. The free version does just about everything you need to make a video but there are a few paid features that you may or may not find beneficial to you. In the free version you can pre record your video onto your device and then add the clips together to edit them, or you can record the clips directly from the app itself and edit them. You can trim, cut, or split clips; add text, muisic, and sound effects; increase and decrease the speed; add transitions between clips for a smoother look; resize, rotate, and copy clips; and edit the brightness, contrast, saturation, and more!! Some of the paid features include things like voice overs and reversing clips. It takes some practice to get the hang of all the features but once you get it you can create some really great videos. Second is an app called PowerDirector. If you have a device that does record in HD then this app is amazing. Again, the free version does just about everything you need to make a video, with a few paid features you may find beneficial. What I find extra awesome about this app is that there are a few paid features that you can access for free just by watching a 30 second ad (which is optional). This option allowed me to access the paid feature of being able to save my videos in Ultra HD and 4K HD for free. That alone I think makes this app better than any others I have tried. But thats not all this app does. Alot of the features are the same as the VideoShop app, although I feel like this app has a better flow and makes things a little easier to learn. Some of the features that are different are things like, the transitions on this app are more professional and you have a lot more choices. Also you can add voice overs and layer things to make them easier to edit. Both of these apps have worked great for me but I would have to say that PowerDirect if my favorite. So now that we have talked about different editing apps and the features you may want to look for in other apps, lets start talking about the set up. When your working on a budget, it could be a challenge to set up a good area to record in. Time, comfort, lighting, a crafty mind, and quiet are the 5 most important things to me when preparing to record a tutorial. First is time and comfort. Most tutorials take a while to record so having somewhere you can sit comfortably for an extended period of time is important. Next is to make sure that the spot you chose has good lighting. Yes, just like with taking pictures, while recording videos you should have good, natural lighting. I am someone that works 3rd shift so this is especially challenging for me sometimes. Ok so you found your comfy spot with good lighting, now you need that crafty mind to set up your device. My tip is to use what you have laying around. I happened to have a small tripod that was not big enough to get a good angle of my work for a video. I hooked my phone up to it and then, I kid you not, I wrapped the end of it around a spare crutch I had from when I hurt my foot. Then i propped up the crutch against a chair and pillows to keep it from tipping over. Then I centered it to where I was recording and I used spare yarn to mark the outside of the frame so I knew where to keep my hands. How you set yours up could effect whether or not you record your tutorial in clips or all the way through too so keep that in mind if that is important to you. So, now that you have a naturally lite, comfy spot and your device set up for recording, you just need to make sure it is quiet. Turn off all Tvs, fans, air conditioners, shut windows, etc. If you have kids or pets, try your best to keep them away or quiet. Background noise can really reduce the quality of a video. But don't think your video is bad just because some noise is in there. As long as your information is all in there and clear, people will listen past the background noise. Bam! Now all you need is to gather up all of your supplies and go for it! There are 2 ways you can go about the actual recording process. You can either record each step in individual clips or record the entire thing from start to finish. If you record each step individually, keep in mind that while editing this could make the process more times consuming due to having to edit and/or delete multiple items. But you can stop and record a new clip if you mess up. Personally, this is how i have been doing it and it hasn't been hard. If you record the entire thing from start to finish this could also be time consuming to edit due to having to clip out multiple takes that don't make the cut. But I think it could make the transitions easier and give you the opportunity to get more information in your video. Editing is something that could take 1 hour or 1 week, sometimes longer. It all depends on the length of your video, the way you recorded it, and the type of person you are. I am a perfectionist when it comes to my own work. I have watched tutorials with poor lighting and background noise and I really didn't think much of it. When I see or hear that in my own videos, it hits me harder. This usually makes the editing process longer for me. I will watch, edit, re watch, edit some more, wait a day, watch again, edit again, and that keeps going on and on until I cant watch it any more. That's the point I rely on my crafty friends to give my work its last look over through fresh eyes. That's my final tip. Have at least 1 crafty friends that you trust to will be open and honest with you about the quality of your work. I dont think anyone starts making tutorials and is perfect from day 1. I think, that with everything in life, you try and fail and try again until you get it right. Luckily, these days we have social media to connect us so we can share information like this for others to see and learn from. As i said in the beginning of this post, I am not a professional at all. I still have a lot of learning to do and I'm sure if my budget allowed for better editing software so i could edit from my computer instead of my phone my videos would be even better. well maybe that could be a future blog post. But we are crafty people working on a budget so this is the advice I have for now. I hope this post has been helpful to some of you! Feel free to comment and share your own tips and tricks if you have some. I know I would appreciate it. Also feel free to contact me with any questions or if you notice any errors. We are all human and don't always catch our own errors so I appreciate any opportunity to be a better designer and blogger. Thank you!! Tag me of social media!! I would love to see your videos if you end up making any! Until next time, Kay - A Cup Of Crochet
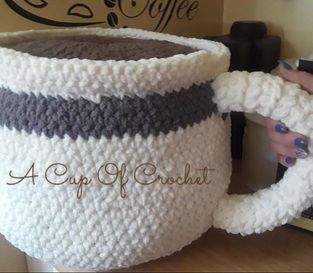
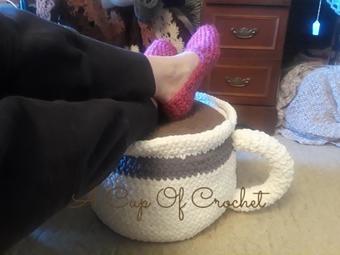
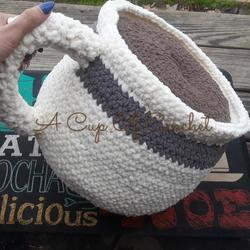 Hey crafty people!! As promised I am releasing one of my paid patterns from Ravelry for free here on my blog. What better pattern than my Cafe Grande Floor Pillow!? Life always gives us ups and downs. This amazing community makes the downs in life so much easier to get through. Being able to focus on something I love to do with the support of others is the greatest gift a girl could ask for. So thank you all for even being here now and reading this. It does make a difference and I hope you are enjoying these posts and patterns!! Now that the mushy stuff is out of the way let's get to it! ** Do not copy, sell, or distribute this pattern. Do not use pattern photos to advertise your own products. Advertising and\or selling of your personal finished pieces is encouraged but please give pattern design credit to A Cup Of Crochet and link back to my blog. Thank you! **
Gauge- 10 stitches and 8 rows = 4 inches ** Crocheting single crochet in the back loop only- (insert your hook into the back loop of the top of the stitch, yarn over and pull up a loop. Yarn over and pull through the 2 loops on your hook ) This part of the pattern is worked in continuous rounds. Use your stitch marker to keep track of the first stitch (or last stitch if preferred) of each round. Color change recommendations will be marked where necessary. Links to add on's will be at the end of the pattern so you can make your coffee into tea, cocoa, or a latte. Cup Using white Bernat Blanket yarn start with a magic circle and Sc 8 into the center. Pull closed. Round 1- Sc inc in each st (16) Round 2- (Sc inc. Sc)* around (24) Round 3- (Sc inc. Sc 2)* around (32) Round 4- (Sc 3, Sc inc.)* around (40) Round 5- (Sc 2, Sc inc. Sc 2)* around (48) Round 6- (Sc inc. Sc 5)* around (56) Round 7- (Sc 3, Sc inc. Sc 3)* around (64) Round 8- (Sc 7, Sc inc.)* around (72) Round 9- (Sc 4, Sc inc. Sc 4)* around (80) Round 10- Sc Blo in each st around (80) Round 11-13 - SC in each st around (80) Round 14- (Sc inc. Sc 9)* around (88) Round 15-24 - Sc in each st around (88) Change colors for the stripe on the cup if desired. Round 25-27 - Sc in each st around (88) Change colors back to white. You can use the handle to hide the color changes later. Round 28-30 - Sc in each st around (88) Round 31- Slst in each st (88) Tie off and use you needle to sew in your ends. This part of the pattern is worked in rows. End each row by chaining the amount given and turning your work. Handle Using white Bernat Blanket yarn start with a ch 9 Row 1- Starting in the second ch from your hook. Hdc in each ch across (8) Row 2-20 - Ch 1 and turn. Hdc in each st across (8) Tie off with a long tail for sewing. Use you needle to sew the right side and left side of the handle together to create a tube. Stuff the tube and then sew the handle onto the side of the cup that shows the color changes to help hide them. This part of the pattern is worked in continuous rounds. Use your stitch marker to keep track of the first stitch (or last stitch if preferred) of each round. Coffee Using brown Bernat Blanket yarn. Start with a magic circle and Sc 8 into the center. Pull closed. Round 1- Sc inc in each st (16) Round 2- (Sc inc. Sc)* around (24) Round 3- (Sc inc. Sc 2)* around (32) Round 4- (Sc 3, Sc inc.)* around (40) Round 5- (Sc 2, Sc inc. Sc 2)* around (48) Round 6- (Sc inc. Sc 5)* around (56) Round 7- (Sc 3, Sc inc. Sc 3)* around (64) Round 8- (Sc 7, Sc inc.)* around (72) Round 9- (Sc 4, Sc inc. Sc 4)* around (80) Tie off with a long tail for sewing. Stuff the cup to your desired firmness. Use your needle to sew the coffee to the inside of the cup on the row above your color change (row 28). Keep in mind that the cup has 88 stitches and the coffee only has 80 stitches when sewing them together. Sew all your ends into your cup of coffee to hide them.
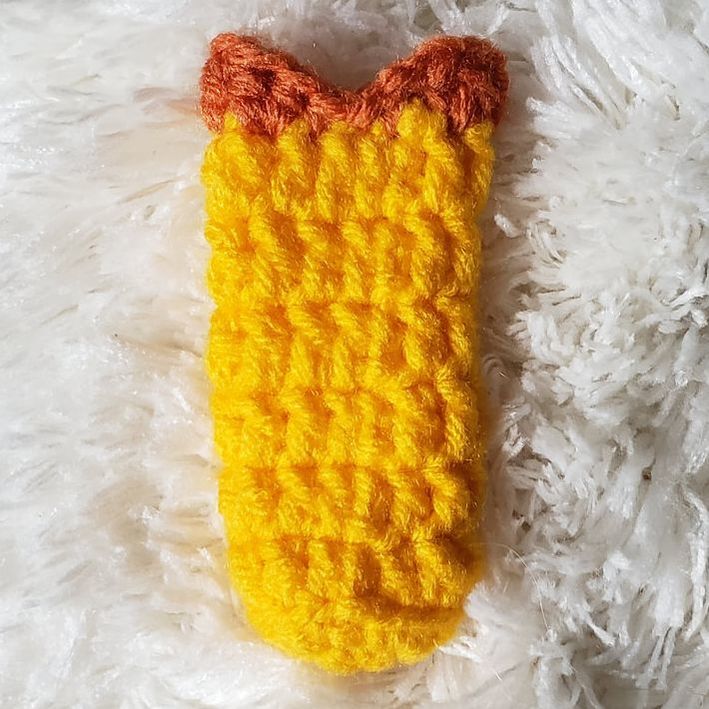
Transform that giant cup of coffee into a latte, cocoa, or tea!! Here are a few links to YouTube tutorials for appliques that are similar to the traditional coffee art on a latte. Sew them to your coffee and give your cup of Joe an extra bit of flare. How to Crochet a - Trio of Perfect Little Hearts How to Crochet Leaf Branch Tutorial 46 Here is a link to a YouTube tutorial for amigurumi marshmallows. Sew them to your coffee and transform it into a cup of cocoa. Kawaii Marshmallow - Crochet Amigurumi | How to crochet in round Here is a link to a written pattern for a tea bag. Sew it to your coffee and transform it into a cup of tea. Crochet Tea Bag All Done!!! 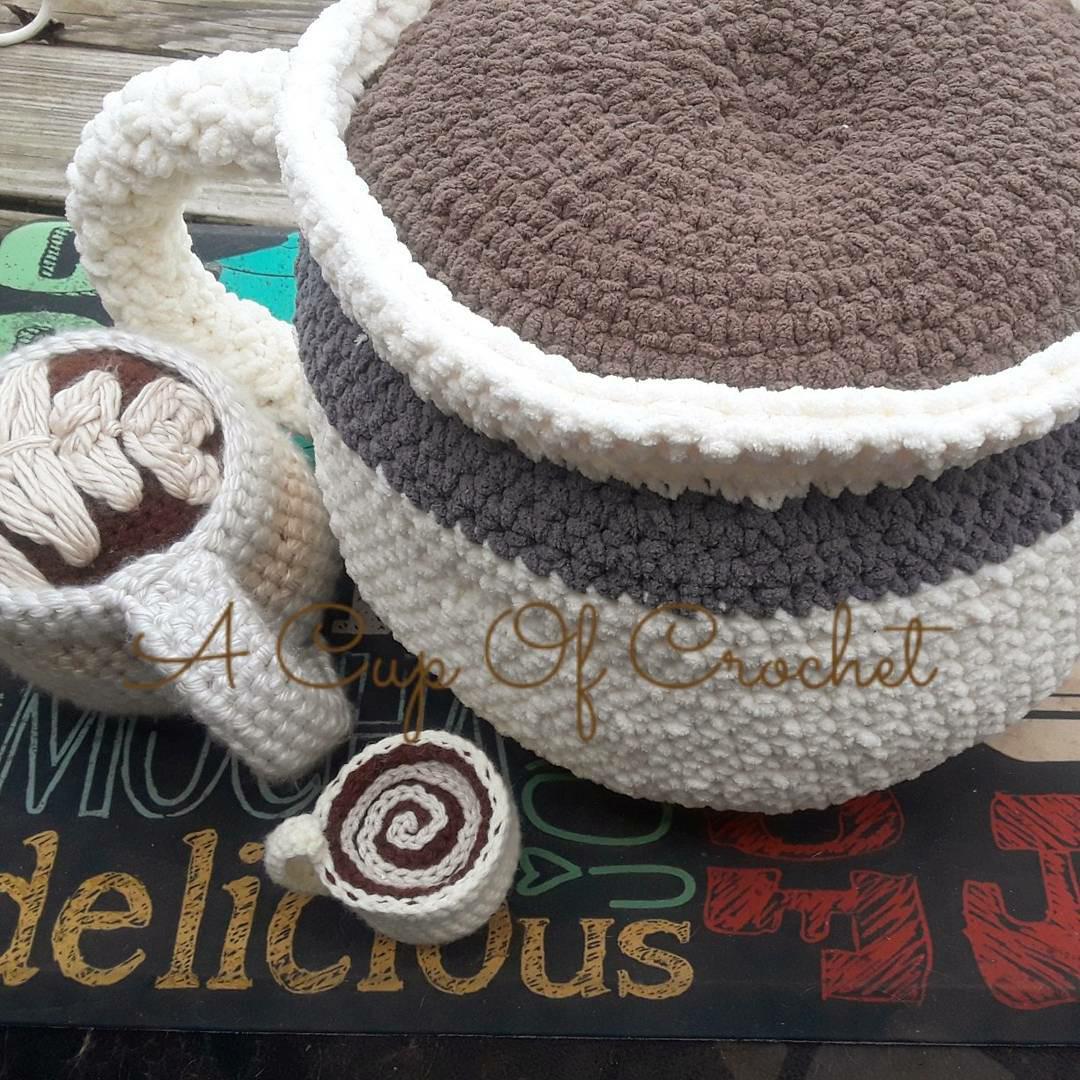 I hope you enjoyed this pattern. Please feel free to contact me with any questions or if you notice any errors. We are all human and don't always catch our own errors so I appreciate any opportunity to be a better designer and pattern writer. Thank you!! Tag me of social media!! I would love to see your Cafe Grande Floor Pillows. Until next time, Kay - A Cup Of Crochet 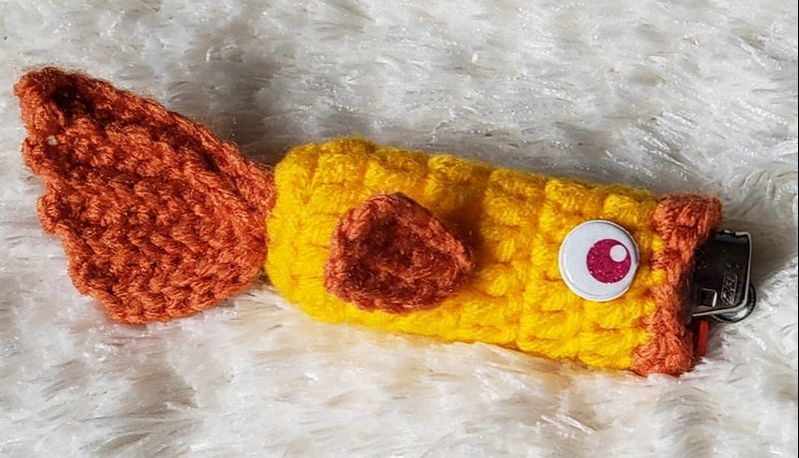 Hey crafty people!!! It's an exciting week because you guys are getting two free blog patterns! I had a pattern sale during the 4th of July and asked social media to help me hit a goal and in return I would post not one but two patterns on my blog. Obviously one is going to be a lighter cover because I just can't stop making them and the other is one of my paid patterns from Ravelry. I love this amazing community of crocheters and crafty people. Your continued love and support makes things like this possible and I hope you have been enjoying these blog posts so far!! If you have missed my last two patterns be sure to check them out. Unicorn Lighter Cover MerTail Lighter Cover Let's get started!! ** Do not copy, sell, or distribute this pattern. Do not use pattern photos to advertise your own products. Advertising and\or selling of your personal finished pieces is encouraged but please give pattern design credit to A Cup Of Crochet and link back to my blog. Thank you! **
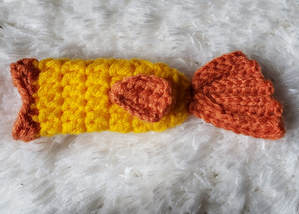
This part of the pattern is worked in rounds. End each round by joining the last stitch to the first stitch using a slip stitch. Beginning chains do NOT count as a stitch throughout the pattern therefore the first stitch of each round will go in same stitch as the chain. Body Using Yellow yarn or cotton. Start with a magic circle and Sc 6 into the center. Pull closed and Join with a slst.
Tie off and switch colors to Orange.
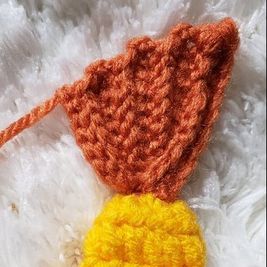
Tie off and use your needle to sew in ends. This part of the pattern is worked in rows. End each row by chaining the amount given and turning your work. Tail Using Orange worsted weight yarn or cotton. Start with a Ch of 11 leaving a long tail to sew with later. Row 1- Starting in the second ch from your hook Sc in each ch across (10) Row 2- Ch 1 and turn. Slst in the first 3 st. Fp Sc around each of the last 7 st. (7+3slst) Row 3- Ch 1 and turn. Sc in the next 7 st. Slst in the 3rd slst from row 2. (7+1slst) Row 4- Ch 1 and turn. Fp Sc around each of the 7 Sc from the previous row. (7) Row 5- Ch 1 and turn. Sc in the next 7 st. Slst in the 2nd slst from row 2. (7+1slst) Row 6- Ch 1 and turn. Fp Sc around each of the 7 Sc from the previous row. (7) Row 7- Ch 1 and turn. Sc in the next 7 st. Slst in the 1st slst from row 2. (7+1slst) Row 8- Ch 1 and turn. Fp Sc around each of the 7 Sc from the previous row. (7)
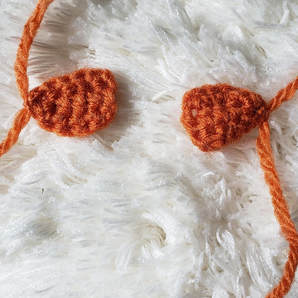
This part of the pattern is worked in rows. End each row by chaining the amount given and turning your work. Fins Make 2. Using Orange worsted weight yarn or cotton. Start with a Ch of 6 leaving a long tail to sew with later.
All Done!!! 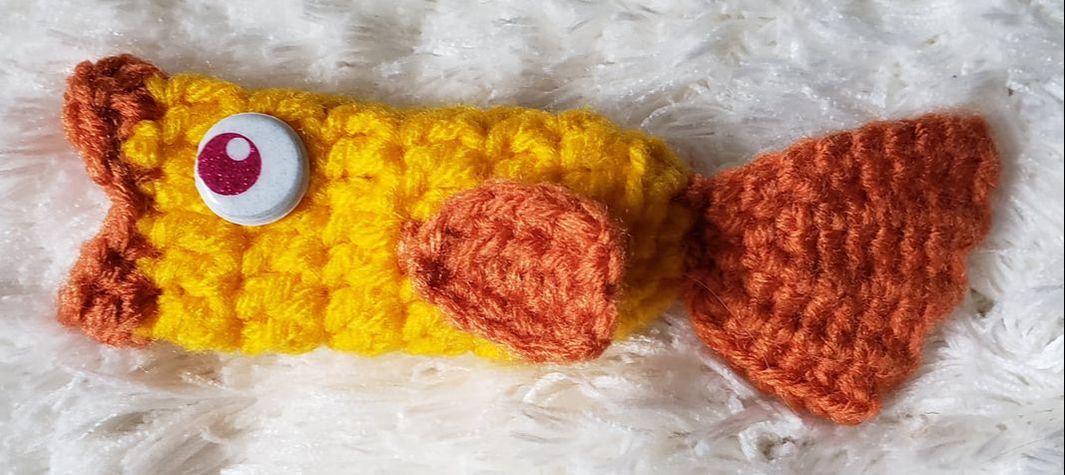 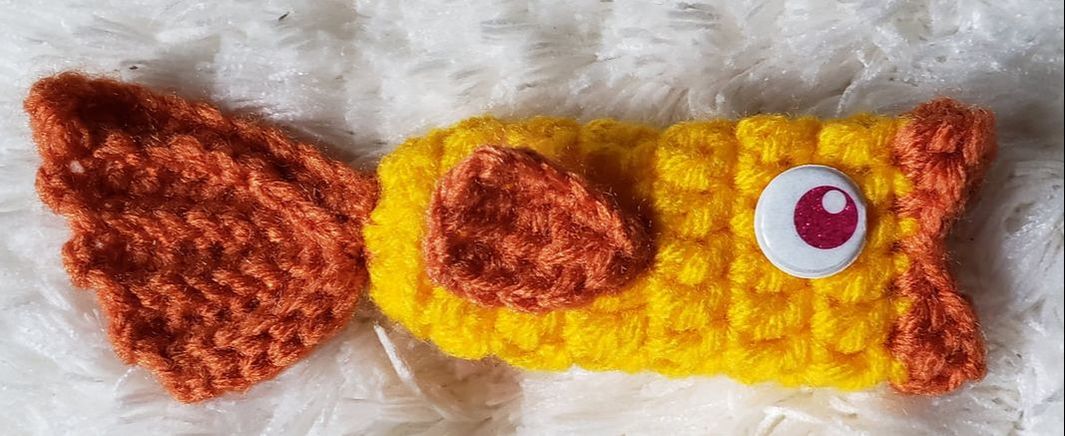 I hope you enjoyed this pattern. Please feel free to contact me with any questions or if you notice any errors. We are all human and don't always catch our own errors so I appreciate any opportunity to be a better designer and pattern writer. Thank you!! Tag me of social media!! I would love to see your Fishy Lighter Covers. Until next time, Kay - A Cup Of Crochet 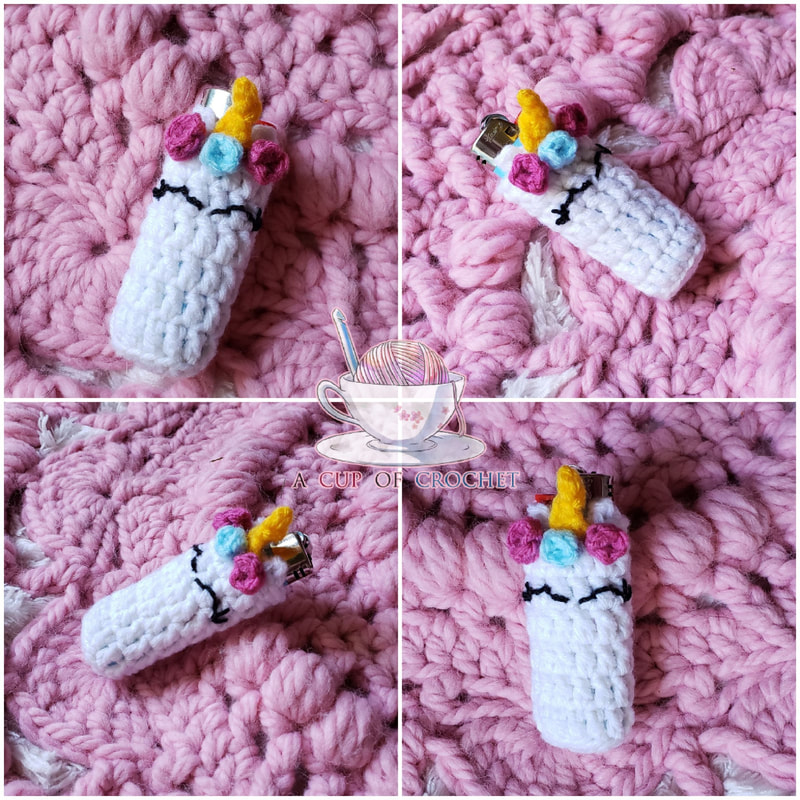
Hey crafty people!!
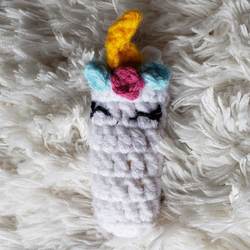
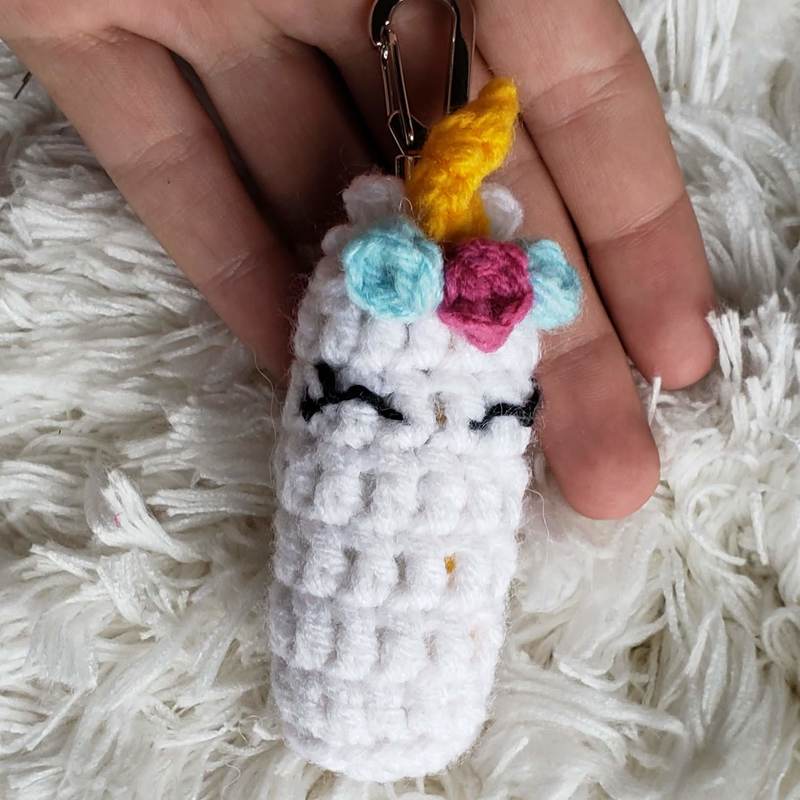
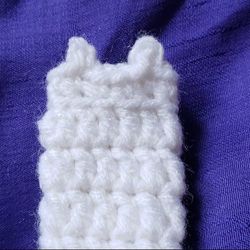
This week I wanted to share my Unicorn Lighter Cover pattern with you all. If you missed last weeks blog post, scroll down and you will find my MerTail Lighter Cover pattern. You can also find the link to my mature/novelty lighter cover pattern only available on Ravelry. I am still not great at these introductions so let just jump right on into it shall we!! ** Do not copy, sell, or distribute this pattern. Do not use pattern photos to advertise your own products. Advertising and\or selling of your personal finished pieces is encouraged but please give pattern design credit to A Cup Of Crochet and link back to my blog. Thank you! **
This part of the pattern is worked in rounds. End each round by joining the last stitch to the first stitch using a slip stitch. Beginning chains do NOT count as a stitch throughout the pattern therefore the first stitch of each round will go in same stitch as the chain.
Body
Using the white yarn or cotton. Start with a magic circle and Sc 6 into the center. Pull closed and Join with a slst.
Tie off and use your needle to sew in ends.
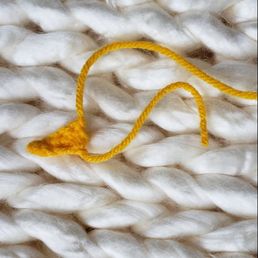
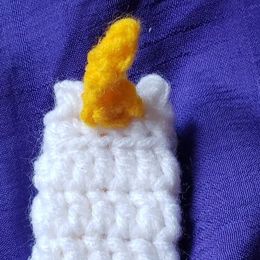
Horn
Using yellow yarn or cotton. Start with a Ch 6 leaving a long tail to sew with later.
Tie off.
Tie off.
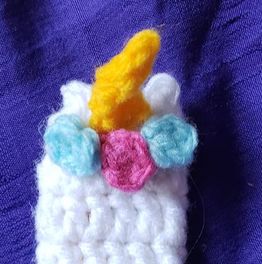
Eyes
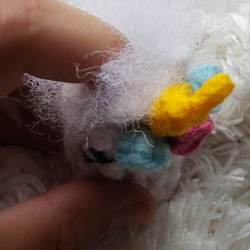
Using black lace weight yarn and your needle. You will be sewing the eyes into the front of round 6 of the body. Follow the pictorial below or watch a quick tutorial here 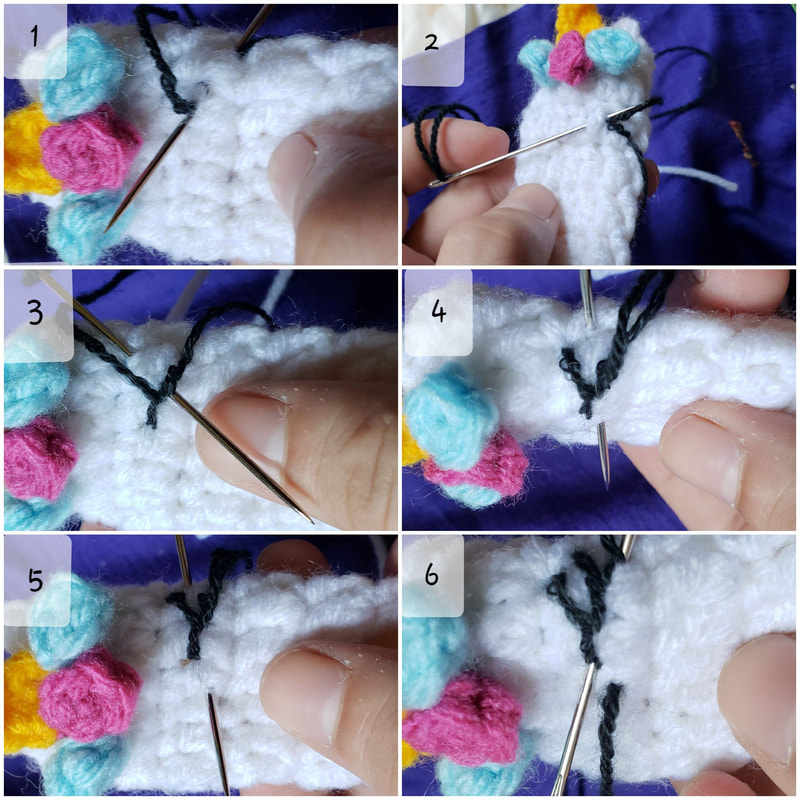
All Done!!!
I hope you enjoyed this pattern. Please feel free to contact me with any questions or if you notice any errors. We are all human and don't always catch our own errors so I appreciate any opportunity to be a better designer and pattern writer. Thank you!! Tag me of social media!! I would love to see your Unicorn Lighter Covers. Until next time, Kay - A Cup Of Crochet |


 RSS Feed

